ShopDreamUp AI ArtDreamUp

Deviation Actions


Description
The drawing is about 8 x 10 inches, which is larger than I normally draw, but I know my parents are going to frame this and wanted to make it as large as possible.
NOTE: I have an ENLARGED VIEW here so you can see details and pencil strokes.
I don't normally post WIPs, but I have had SO many people ask me to do a hair tutorial, I thought this might be the next best thing. The reason I have not done a hair tutorial, is because there are so many different types and colors of hair, that each one is different.
I do all hair in layers, meaning that I usually do a base layer, and then built on top of that. Sometimes I blend that base layer, sometimes I don't. It depends on a lot of factors. Background can change everything for EACH type of hair!
In this for example, BECAUSE THE BACKGROUND is mostly black, and his hair was mostly blonde, I first blackened his tuxedo, and worked my way into the hair, using both an overhand and normal pencil grip, using B & 2B. There are other steps, but the highlights were made by taking my TUFF STUFF stick eraser (buy here [link]) with a angle cut edge (more rigid than a kneaded eraser) and swiping the highlights out (right side). I will do the same for the left side too. For the top, I want to build upward from dark to light, with the final steps being to bring out highlights and add wild hair wisps against the background.
When drawing hair, it's important to remember that you want to create "the illusion of hair" by NOT drawing the individual hairs themselves. A lot of hair is created using "negative space drawing" (see tip guide link [link]) which is basically drawing around something, so that what remains is the object you were drawing. Example: Michelangelo said that he made that statue of David, by REMOVING what was NOT David. In that regard, all I do is remove the part of the paper that is NOT my subject")
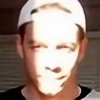
In response to some comments from WIP #1 - YES I did decide to amp up the contrast a little bit. This is an OLD photo from the mid 90's (note the Mullet hair style ha) and it is grainy, blurry in areas, and does not have a lot of clear definition in the details, especially around the eyes, where I always invest the most time. However, I do know the subject better than any celeb I draw, so that helps. I would normally NOT work with this photo, but it's one of my parent's favs.
Check out my photo requirement guideline link I give to anyone who wants to hire me to draw them HERE: [link]
I also cover a lot about photo selection my TIP GUIDE HERE: [link]
REF PHOTO: Also see WIP #1
NOTE: I have an ENLARGED VIEW here so you can see details and pencil strokes.
I don't normally post WIPs, but I have had SO many people ask me to do a hair tutorial, I thought this might be the next best thing. The reason I have not done a hair tutorial, is because there are so many different types and colors of hair, that each one is different.
I do all hair in layers, meaning that I usually do a base layer, and then built on top of that. Sometimes I blend that base layer, sometimes I don't. It depends on a lot of factors. Background can change everything for EACH type of hair!
In this for example, BECAUSE THE BACKGROUND is mostly black, and his hair was mostly blonde, I first blackened his tuxedo, and worked my way into the hair, using both an overhand and normal pencil grip, using B & 2B. There are other steps, but the highlights were made by taking my TUFF STUFF stick eraser (buy here [link]) with a angle cut edge (more rigid than a kneaded eraser) and swiping the highlights out (right side). I will do the same for the left side too. For the top, I want to build upward from dark to light, with the final steps being to bring out highlights and add wild hair wisps against the background.
When drawing hair, it's important to remember that you want to create "the illusion of hair" by NOT drawing the individual hairs themselves. A lot of hair is created using "negative space drawing" (see tip guide link [link]) which is basically drawing around something, so that what remains is the object you were drawing. Example: Michelangelo said that he made that statue of David, by REMOVING what was NOT David. In that regard, all I do is remove the part of the paper that is NOT my subject
In response to some comments from WIP #1 - YES I did decide to amp up the contrast a little bit. This is an OLD photo from the mid 90's (note the Mullet hair style ha) and it is grainy, blurry in areas, and does not have a lot of clear definition in the details, especially around the eyes, where I always invest the most time. However, I do know the subject better than any celeb I draw, so that helps. I would normally NOT work with this photo, but it's one of my parent's favs.
Check out my photo requirement guideline link I give to anyone who wants to hire me to draw them HERE: [link]
I also cover a lot about photo selection my TIP GUIDE HERE: [link]
REF PHOTO:
Also see WIP #1 Image size
1111x1409px 208.19 KB
© 2011 - 2024 Doctor-Pencil
Comments14
Join the community to add your comment. Already a deviant? Log In
Lookin great!!!